What to Hang on a Staircase Wall When the Ceiling Height Changes
If you’ve ever stood at the bottom of your staircase, looked up at that long diagonal wall, and thought “what on earth do I do with this” then you are in very good company. The staircase wall with a changing ceiling height is one of the most commonly googled decorating questions for a reason. It is genuinely tricky. The wall is not straight across the top like a normal wall. It follows the slope of the stairs which means standard decorating rules simply do not apply.
Most people either leave it completely bare because they do not know where to start, or they hang a few random frames that end up looking awkward and unplanned. Neither of those outcomes does justice to what is actually one of the most prominent and most-seen walls in the entire home. Everyone who visits your house sees that staircase wall. Everyone who lives there walks past it multiple times every day.
This guide covers everything you need to know about hanging art, mirrors, lights, and other elements on a staircase wall where the ceiling height changes, including exactly how to plan it, what works, what does not, and how to make it look like you hired a designer to do it.
Why the Staircase Wall With a Changing Ceiling Is So Challenging
It helps to understand exactly why this wall is harder to decorate than a normal one before jumping into solutions.


A standard wall is rectangular. It has a flat top, a flat bottom, and two vertical sides. Hanging art on it is relatively straightforward because everything is parallel and symmetrical. A staircase wall is a parallelogram at best and an irregular polygon at worst. The ceiling above it slopes diagonally, the floor below it steps down in increments, and the available wall space changes dramatically from the top of the staircase to the bottom.
This means that arrangements that look perfectly balanced on a flat wall look completely wrong on a staircase wall if you apply the same rules. Frames that would be at eye level on a regular wall end up either too high or too low depending on where you are standing on the stairs. The visual center of the wall shifts as you move along it. And the diagonal line created by the staircase itself is a strong visual element that either works with your arrangement or fights against it.
The good news is that once you understand these challenges there are very clear and proven strategies that make the staircase wall look genuinely beautiful. Here is what they are.
1. Follow the Staircase Line With a Diagonal Arrangement
This is the most classic approach to a staircase gallery wall and it works because it works with the architecture rather than against it. Instead of trying to hang art in a horizontal or grid arrangement like you would on a normal wall, you follow the diagonal line of the staircase itself and let your frames step upward at roughly the same angle as the stairs.
How to Plan a Diagonal Arrangement
Stand back and look at your staircase wall. The line where the ceiling meets the wall creates a diagonal that rises as you go up the stairs. Your arrangement should roughly follow this line, with frames stepping up at a similar angle from the bottom of the staircase to the top.
The key word is roughly. You are not trying to create a perfectly mathematical diagonal. You are creating a visual flow that feels like it moves naturally upward with the staircase. Frames can vary in size, the spacing does not need to be identical between each one, and the arrangement can be one frame wide or several frames wide depending on how much wall space you have.
What to Hang in a Diagonal Arrangement
A mix of frame sizes works better than identical frames in a diagonal arrangement. Larger frames at wider points of the wall, smaller frames where the wall narrows near the top or bottom. A combination of portrait and landscape orientations adds visual variety. Keeping the frames in the same color family, all black, all white, all natural wood, or a mix of black and brass, gives the arrangement cohesion even when the sizes and contents vary considerably.
How Many Frames to Use
This depends entirely on the length of your staircase. A short staircase of four to six steps might suit three to five frames arranged diagonally. A longer staircase of ten or more steps can handle eight to fifteen frames or more. The arrangement should feel full enough to look intentional but not so packed that it feels claustrophobic. Aim for consistent spacing between frames, somewhere between two and four inches, and let the arrangement breathe.
2. Create a Grid Gallery That Defies the Slope
This approach is less intuitive but when executed well it looks absolutely stunning. Instead of following the diagonal line of the ceiling, you hang your frames in a perfectly level, perfectly spaced grid and let the changing ceiling height create a dramatic frame around the arrangement.
Why This Works
A level grid on a sloped wall creates a deliberate tension between the rigid geometry of the frames and the diagonal geometry of the architecture. The frames look intentionally placed rather than accommodating the slope and the result is a gallery wall that feels confident, modern, and almost architectural in its quality.
This approach works best on staircase walls that have a generous amount of wall space so the grid can be large enough to fill the visual field properly. It also works better when the frames and their contents are relatively consistent in style since the arrangement itself is making the visual statement rather than the variety of the pieces.
How to Execute a Grid Gallery on a Sloped Wall
The most important thing is to use a level when hanging every single frame. Every frame must be perfectly horizontal regardless of what the ceiling above it is doing. The spacing between frames must be identical in every direction, the same gap horizontally and vertically throughout the entire grid.
Choose your grid position based on the center of the wall rather than the top or bottom. Find the approximate middle of the usable wall space and build your grid outward from there. This ensures the grid feels centered and balanced rather than floating awkwardly toward one end of the wall.
3. Hang One Large Statement Piece
Sometimes the bravest and most effective thing you can do on a staircase wall is hang a single large piece of art or a large mirror and leave everything else alone. This approach requires confidence but the result is often more impactful than any gallery arrangement.
Why a Single Large Piece Works So Well
A staircase wall with a changing ceiling already has a lot of visual complexity. The diagonal ceiling line, the stepping floor, the balusters and handrail, the rhythm of the stair treads. Adding a busy gallery wall on top of all that architectural activity can sometimes feel overwhelming. One large, calm piece of art acts as a counterpoint to all that movement. It gives the eye a place to rest and creates a sense of composure in a space that is inherently in motion.
What Counts as Large Enough
On a staircase wall, go bigger than you think you should. A piece that would feel large in a normal room often looks appropriately scaled on a staircase wall simply because the wall itself is so tall. A canvas or print that is at least 24 by 36 inches is a starting point. Something 36 by 48 inches or larger is often even better. The piece should feel like it commands the wall, not apologizes for being there.
Where to Hang It
Position a single large piece at a point on the staircase wall where the ceiling height gives you the most room. This is usually somewhere in the middle section of the staircase rather than at the very top or very bottom. Hang it so the center of the piece is at approximately eye level for someone standing on the stair closest to it. This placement feels natural and comfortable as you ascend or descend.
4. Use Mirrors to Reflect Light and Add Drama
Mirrors on a staircase wall are one of the most effective and underused decorating choices. They reflect both natural and artificial light down the stairwell, they make the space feel larger and brighter, and in a space that is often quite narrow and enclosed they add a sense of depth and openness that nothing else quite replicates.

How to Use Mirrors on a Sloped Staircase Wall
A single large mirror placed on the wall where the ceiling is at its highest point is the most impactful approach. An arched mirror works particularly well on a staircase wall because the curved top echoes the sense of movement in the space and softens the hard diagonal of the ceiling line.
A collection of mirrors in different shapes and sizes arranged similarly to a gallery wall is another beautiful option. Circular mirrors, oval mirrors, rectangular mirrors, and arched mirrors mixed together create an eclectic, collected feel that looks like it was assembled over time rather than purchased as a set.
Mirrors Combined With Art
Some of the most beautiful staircase walls combine mirrors and artwork in the same arrangement. A large mirror as the centerpiece with framed art arranged around it, or alternating mirrors and frames in a diagonal arrangement, creates a gallery wall that is more dynamic and light-filled than one composed entirely of art.
5. Install Wall Sconces for Atmosphere and Practicality
Staircase walls are almost always lit by a single overhead light at the top or bottom of the stairs and nothing more. Adding wall sconces to the staircase wall changes the entire atmosphere of the space and makes it feel dramatically more considered and beautiful.
Why Sconces Work So Well on Staircase Walls
Sconces provide light at eye level rather than from directly overhead which creates a warmer, more atmospheric quality of light that overhead fixtures simply cannot replicate. On a staircase wall they also serve a practical purpose, illuminating the steps for safety, particularly important at night.
And from a purely decorative perspective, sconces on a staircase wall look exceptional. They add a hotel-lobby or boutique-residence quality that makes the whole staircase feel like a designed space rather than just a functional connection between floors.
How to Space Sconces on a Changing-Height Wall
This is where most people get stuck. On a normal wall you would space sconces at even intervals at the same height. On a staircase wall where the ceiling height changes you have two options.
The first is to step the sconces up at the same angle as the stairs, maintaining the same distance from the ceiling on each one so they follow the diagonal line of the staircase. This looks very elegant and deliberate. The second is to keep all sconces at the same absolute height from the floor, which creates a level horizontal line of lights that contrasts deliberately with the diagonal ceiling. This is bolder and more modern in feel.
Both approaches work beautifully. Choose the one that suits the overall style of your home.
Battery-Operated Sconces
If hardwiring sconces into your staircase wall is not practical or in budget, battery-operated wireless sconces have improved enormously in 2026 and are a genuinely viable alternative. Many are rechargeable, have realistic flame-effect settings or warm dimmable light, and look identical to hardwired versions from a few feet away.
6. Try a Wallpaper Accent on the Staircase Wall
Instead of hanging things on the staircase wall, consider treating the wall itself as the decorative element. A bold, beautiful wallpaper on the staircase wall makes the entire space a statement and means you may need little or nothing hung on top of it at all.
Why Wallpaper Works Especially Well Here
The staircase wall is one of the few walls in a home where wallpaper can be appreciated from a distance and in motion. As you walk up or down the stairs the pattern reveals itself progressively which creates a sense of visual journey that static wall art cannot replicate. A botanical print, a dramatic geometric, a classic stripe, a mural-style landscape, or a textured grasscloth all work beautifully in this context.
Peel and Stick Wallpaper
For renters or anyone who wants a lower-commitment option, peel-and-stick wallpaper on a staircase wall is entirely achievable in 2026 and the quality of available options is genuinely impressive. The challenge is cutting the paper to accommodate the diagonal ceiling line but this is manageable with careful measuring and a sharp craft knife.
Wallpaper Plus Art
If you use wallpaper on the staircase wall but still want to hang something on it, keep the art to a minimum. One or two frames maximum, chosen specifically to complement the wallpaper’s colors and style. Trying to add a full gallery wall on top of a patterned wallpaper creates visual chaos rather than visual interest.
7. Hang a Series of Identical Frames
There is something deeply satisfying about a series of identical frames hung at perfectly even intervals along a staircase wall. It feels orderly, deliberate, and elegant in a way that a mixed gallery arrangement sometimes does not.
How to Make Identical Frames Work on a Sloped Wall
The key decision is whether to follow the slope of the stairs with the frames, stepping each one up slightly higher than the last at the same angle as the ceiling, or to keep them all perfectly level in a horizontal line.
Following the slope creates a very clean, architectural look that works particularly well in modern or minimalist homes. Keeping them level creates a deliberate contrast between the orderly frames and the angled ceiling that works well in both traditional and contemporary spaces.
What to Put in Identical Frames
Botanical prints in the same color palette. Black and white family photographs. Abstract art prints in a cohesive series. Simple typographic prints. Maps of meaningful places. The content matters less than the consistency since the visual power of this approach comes from the repetition and order of the identical frames.
In 2026 a series of simple black frames with white mounts containing botanical line drawings or architectural illustrations is a particularly popular choice for staircase walls. It feels timeless, elegant, and personal without being complicated.
8. Create a Photo Wall That Tells Your Family Story
A staircase wall is one of the most natural and meaningful places in a home for family photographs. It is a wall you pass every day, it is prominent enough to be seen by guests, and it has enough vertical space to accommodate a large and evolving collection of images.
How to Approach a Family Photo Wall on a Staircase
The most successful family photo walls on staircases feel collected and personal rather than perfectly curated and designed. Mix old photographs with recent ones. Mix black and white with color. Mix formal portraits with candid moments. The arrangement should feel like it grew organically over time even if you planned and hung it all in a single afternoon.
Frame consistency matters more here than content consistency. Keeping all frames in the same finish, all black, all white, all natural wood, or a mix of two complementary finishes, gives the wall coherence even when the photos themselves vary wildly in style, era, and subject matter.
Leave Room to Add More
One of the best things about a family photo wall is that it should never be truly finished. When you plan the arrangement leave gaps for new frames to be added as time passes. New babies, new milestones, new memories. A photo wall that grows with your family is more meaningful and more alive than a perfectly complete one that never changes.
9. Add Architectural Interest With Molding or Paneling
If hanging art and mirrors is not quite what you are looking for, adding architectural detail directly to the staircase wall is a beautiful alternative that gives the wall enormous character without anything being hung on it at all.
Picture Frame Molding
Picture frame molding involves attaching rectangular frames of thin wooden molding directly to the wall surface to create a series of recessed-looking panels. On a staircase wall these panels can follow the diagonal of the stairs, stepping up as the staircase rises, or they can be arranged in a more geometric grid. Either way the result is a wall that looks bespoke, architecturally interesting, and as though it has always been part of the house.
Paint the molding in the same color as the wall for a subtle, tonal effect. Paint it in a contrasting color for a more dramatic look. Either approach is beautiful and either one costs a fraction of what actual architectural renovation would cost.
Board and Batten or Shiplap
A board-and-batten treatment on the lower half of the staircase wall with a contrasting paint color above it is a classic approach that adds warmth and structure to a space that can otherwise feel very plain. Shiplap paneling on the full wall creates a relaxed, organic texture that works beautifully in coastal, farmhouse, and Scandinavian-inspired interiors.
Both of these treatments handle the changing ceiling height naturally because they do not need to meet the ceiling in a precise way. They simply run up the wall to whatever height you choose and the ceiling does whatever it does above them.
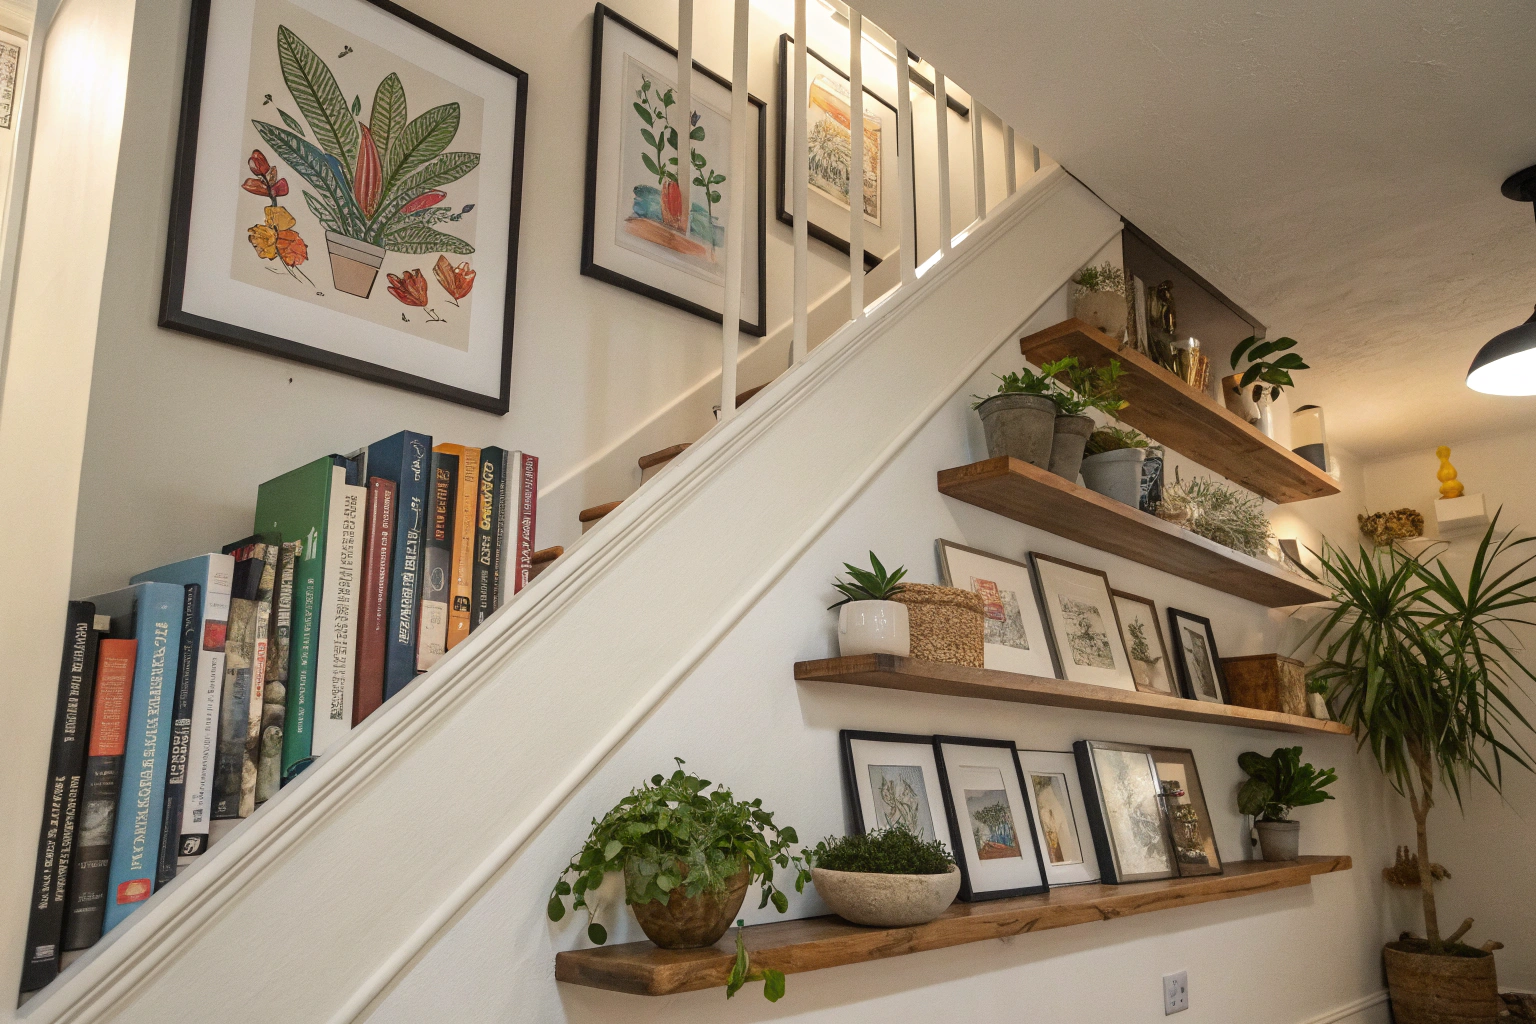
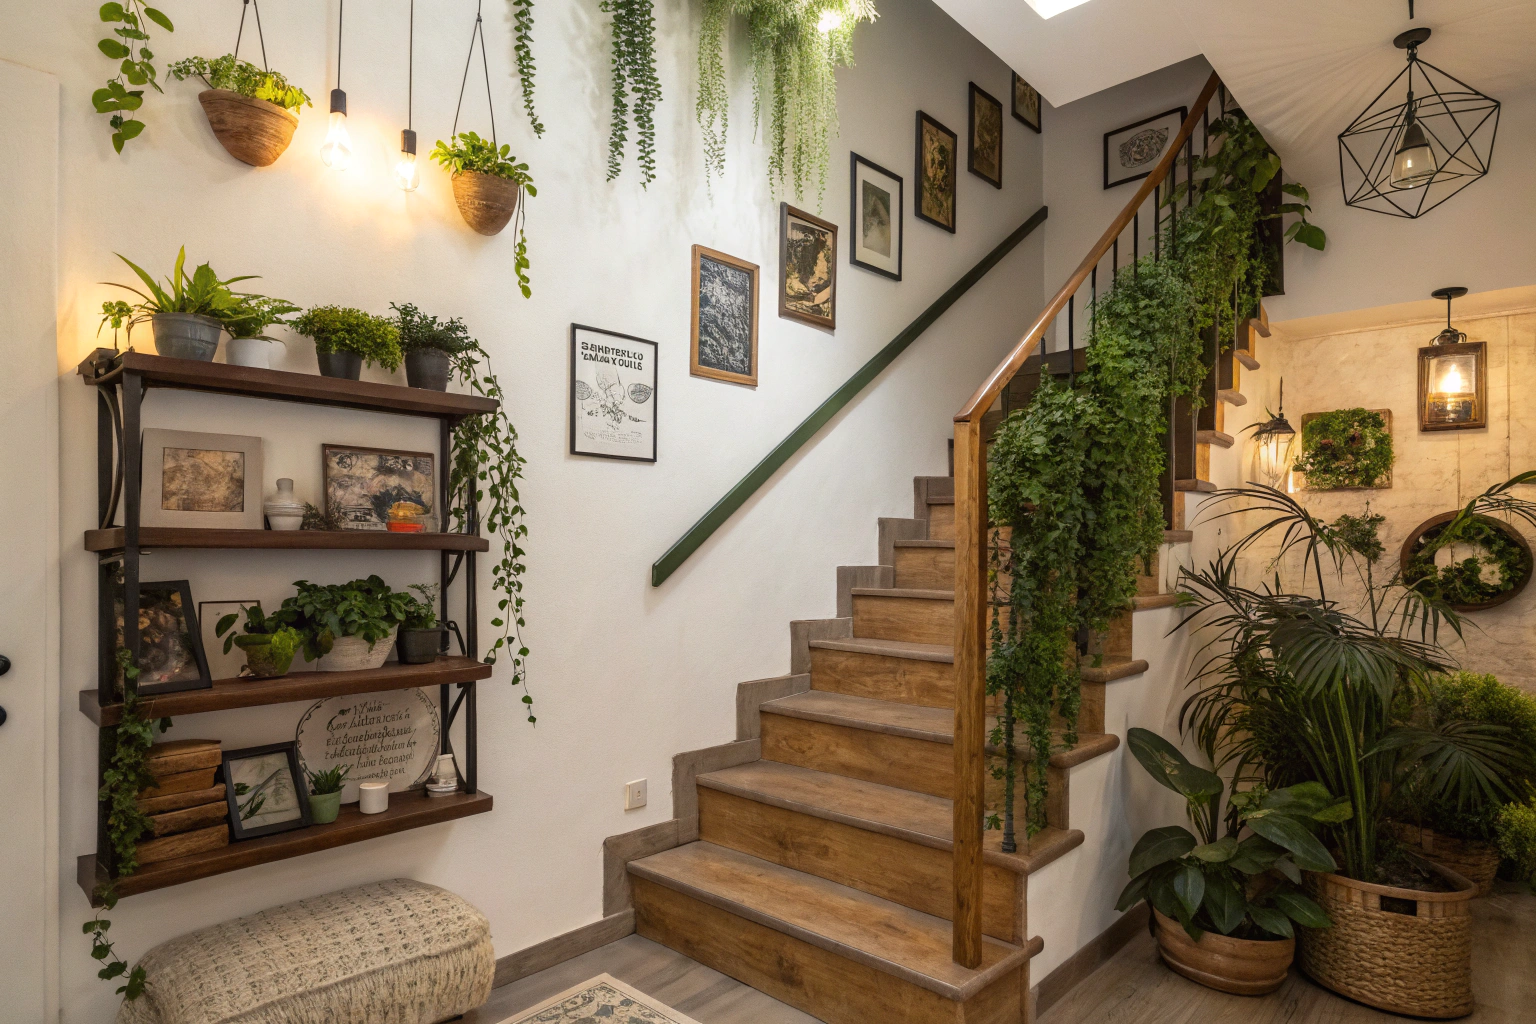
10. Use Plants and Greenery as a Living Installation
This is the most unexpected idea on this list and possibly the most beautiful when done well. Using plants on a staircase wall, whether on shelves, in wall-mounted planters, or as a hanging installation from the ceiling, creates a living element that no art or mirror can replicate.
Wall-Mounted Planters
A series of wall-mounted planters arranged along the staircase wall in a diagonal arrangement following the line of the stairs creates a genuinely stunning living gallery. Trailing plants like pothos, string of pearls, or ivy that cascade downward from each planter add movement and abundance. Choose planters in a consistent material, all ceramic in the same glaze, all woven rattan, or all matte black metal, for a cohesive look.
Hanging Plants From the Stairwell Ceiling
If your stairwell has a high ceiling above the staircase, hanging plants at varying heights from the ceiling creates a dramatic cascading green installation that looks extraordinary from both above and below. This approach requires careful attention to watering since ceiling-hung plants can be tricky to reach but the visual impact is unmatched.
Combining Plants With Art
A few well-placed plants integrated into a gallery wall arrangement, perhaps a trailing pothos on a shelf between two frames, or a small mounted planter as part of a mixed wall arrangement, adds a living, breathing quality to what would otherwise be a purely static display.
How to Plan Your Staircase Wall Arrangement Before Putting Any Holes in the Wall
Regardless of which approach you choose, planning your arrangement before committing to any nail holes is essential on a staircase wall. The changing ceiling height makes mistakes harder to correct and repositioning frames multiple times leaves a wall full of holes that are difficult to hide.
The Paper Template Method
Cut pieces of paper or brown craft paper to the exact size of each frame you plan to hang. Tape them to the wall in your planned arrangement using painter’s tape which removes cleanly without damaging paint. Step back and look at the arrangement from the bottom of the stairs, from the middle, and from the top. Live with the paper templates for a day or two before committing. This low-tech method has been used by interior designers for decades and it remains the most reliable way to plan a gallery wall without making costly mistakes.
The Digital Planning Method
Several apps and tools in 2026 allow you to photograph your staircase wall and digitally overlay frames and art in different arrangements before touching a single nail. This is particularly useful for staircase walls where the changing ceiling height makes it genuinely difficult to visualize how an arrangement will look. A few minutes of digital planning can save hours of repositioning and replastering.
The One Rule That Always Applies
Whatever arrangement you choose, maintain consistent spacing between frames throughout. Inconsistent gaps between frames is the single most common reason a gallery wall looks accidental rather than intentional. Decide on your spacing, two inches, three inches, or four inches, and stick to it throughout the entire arrangement. This consistency is what separates a gallery wall that looks designed from one that looks random.
Conclusion
The staircase wall with a changing ceiling height is one of the most challenging walls in the home to decorate but it is also one of the most rewarding. Get it right and you have a feature that guests notice immediately, that makes your home feel considered and designed from top to bottom, and that you take genuine pleasure in seeing every single day.
The key is choosing an approach that works with the architecture rather than against it. Follow the diagonal with a stepped gallery arrangement. Contrast it boldly with a level grid. Anchor it with a single large statement piece. Illuminate it with sconces. Dress the wall itself with wallpaper or molding. Bring it to life with plants. Any of these approaches executed well will transform your staircase wall from a source of decorating anxiety into one of the most beautiful features in your home.
Start with the paper template method before touching a single nail. Take your time with the planning because the staircase wall rewards patience. And remember that the changing ceiling height is not a flaw in the canvas. It is the thing that makes this wall uniquely interesting and uniquely yours.
Frequently Asked Questions (FAQs)
How do you hang pictures on a staircase wall where the ceiling slopes?
The most popular approach is to follow the diagonal line of the staircase with your frames, stepping each one up at roughly the same angle as the stairs. Use the paper template method first, cutting paper to the size of each frame and taping it to the wall with painter’s tape, to plan the arrangement before making any nail holes. Maintain consistent spacing between frames throughout and use a level to ensure each frame is perfectly horizontal even as the arrangement steps upward.
What is the best size art for a staircase wall?
Go larger than you think you need to. Art that would feel appropriately sized in a normal room often looks too small on a tall staircase wall. A mix of sizes works well in a gallery arrangement with larger pieces anchoring the arrangement and smaller ones filling in. For a single statement piece, aim for at least 24 by 36 inches and consider going larger if the wall and ceiling height allow.
How do you arrange a gallery wall on a staircase?
Use the paper template method to plan before hanging anything. Cut paper to the size of each frame, tape it to the wall, and step back to assess the arrangement from different points on the staircase. Follow the diagonal line of the stairs with your arrangement for the most classic approach. Keep spacing between frames consistent throughout, two to four inches works well for most arrangements, and keep all frames level using a spirit level when hanging.
Should staircase art follow the slope of the stairs?
It does not have to but it usually looks better when it does. Arrangements that follow the diagonal of the staircase feel natural and architecturally harmonious. Arrangements that deliberately stay level and contrast with the slope can also look stunning but require more confidence in execution. Both approaches work when done intentionally. The thing that does not work is a randomly placed arrangement that neither follows nor deliberately contrasts with the slope.
Can you put a large mirror on a staircase wall?
Absolutely and it is one of the most effective things you can do. A large mirror reflects light down the stairwell, makes the space feel bigger and brighter, and creates a focal point that anchors the entire wall. Arched mirrors work particularly well on staircase walls because their curved form softens the hard diagonal of the ceiling. Position the mirror where the ceiling height is at its greatest for maximum impact.
How high should you hang art on a staircase wall?
This is trickier on a staircase than on a normal wall because the viewing height changes as you move along the stairs. A good general rule is to hang each piece so its center is at approximately eye level for someone standing on the stair closest to it. For a gallery arrangement this means the whole arrangement steps upward as the staircase rises. The key is to view the arrangement from multiple points on the staircase before committing to final positions.
What should I not do when decorating a staircase wall?
Avoid hanging frames too small for the scale of the wall since they will look lost and timid. Avoid inconsistent spacing between frames since this makes an arrangement look accidental rather than intentional. Avoid placing art so high it cannot be appreciated at a comfortable viewing angle from the stairs. And avoid leaving large awkward gaps in an arrangement that make it look unfinished. Plan thoroughly before making any holes in the wall.
Is wallpaper a good idea for a staircase wall with a sloped ceiling?
Yes and it is a particularly beautiful option because the pattern can be appreciated in motion as you walk up and down the stairs. The sloped ceiling does create a challenge at the top edge of the wall where the paper needs to be cut at a diagonal angle. Measure carefully, use a sharp craft knife, and take your time with this cut. Peel-and-stick wallpaper is a good option for first-timers since it is more forgiving and repositionable than paste wallpaper.
- Why Pantry Organization Never Lasts (And What Actually Works) - March 26, 2026
- How to Organize a Pantry That Has No Shelves (2026 Guide) - March 26, 2026
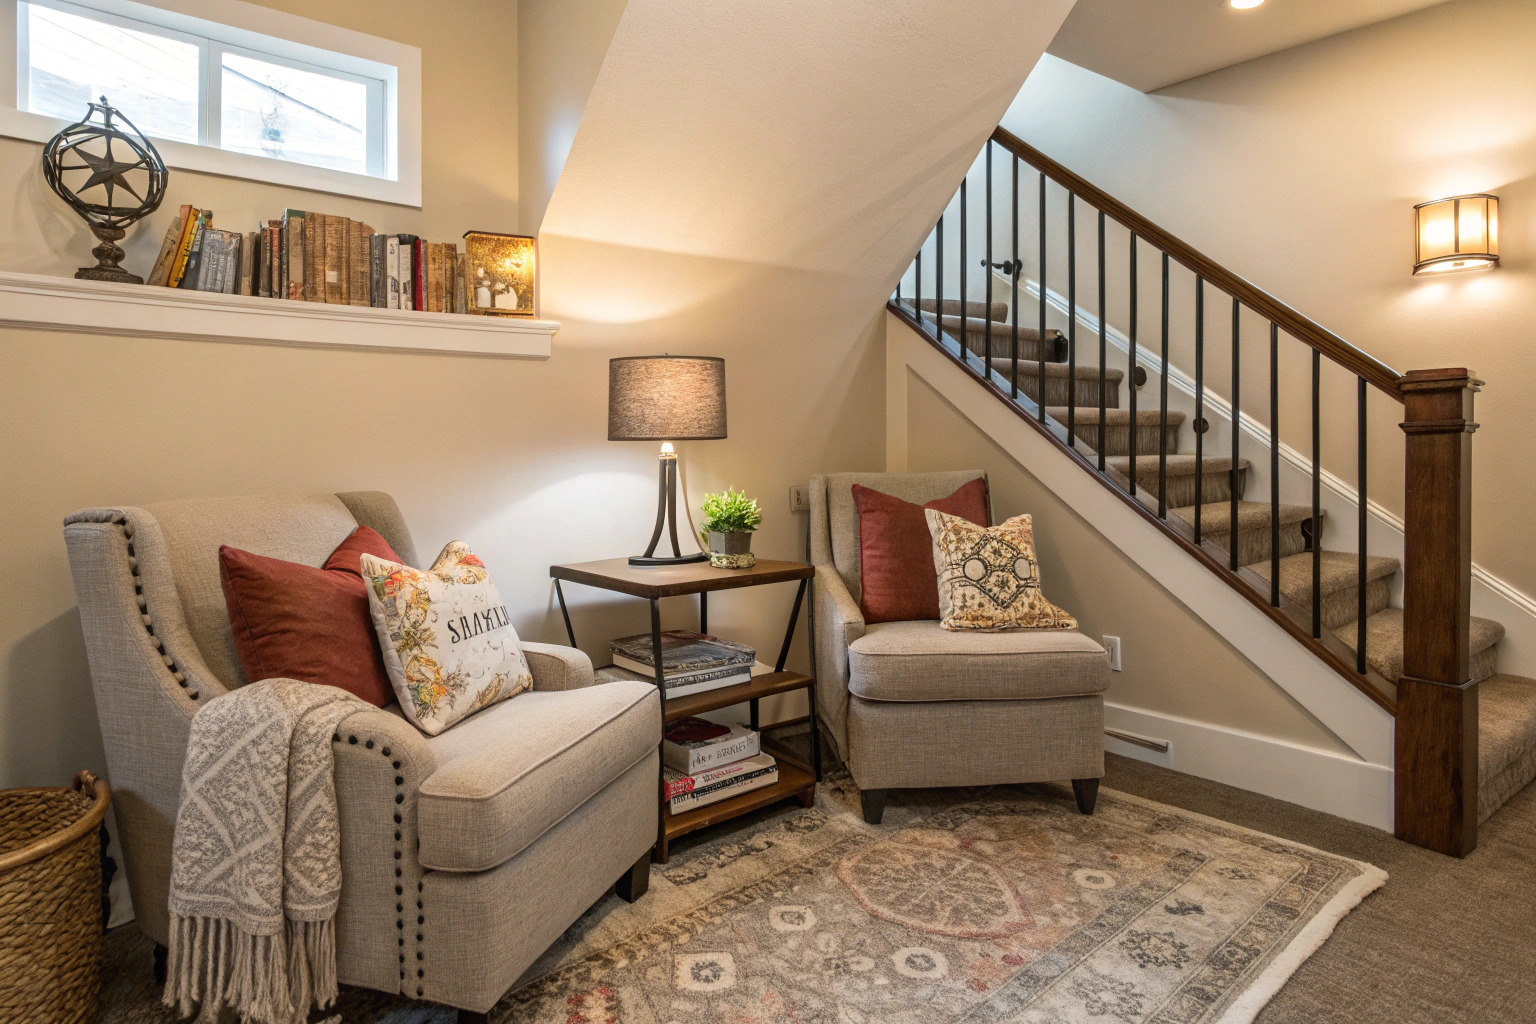
- How to Style a Staircase Landing as a Reading Nook Without Renovation (2026 Guide) - March 26, 2026