How to Paint a Room Without Making a Mess: A Complete Guide
If you’ve ever finished painting a room only to find paint splatters on your floor, furniture, or ceiling, you’re not alone.
Learning how to paint a room without making a mess is all about preparation, technique, and using the right tools.
Whether you’re a first-time DIYer or a seasoned home improver, this guide will walk you through every step to get a clean, professional-looking paint job without the chaos.
Why Proper Room Painting Preparation Is the Key to a Mess-Free Job
Most painting disasters don’t happen during the painting itself but they happen because of skipped prep work. Before you even open a can of paint, proper room painting preparation is non-negotiable. A few extra minutes of prep can save you hours of cleanup and protect your floors, furniture, and trim from accidental drips and splatters.
Preparation is the single biggest difference between a messy amateur job and a clean, professional finish.
What You Need Before You Start Painting a Room
Having the right supplies on hand makes the entire process smoother and cleaner. Here’s everything you need to paint a room without making a mess:
- Interior latex or acrylic paint (chosen for the room type)
- High-quality paint roller and roller tray
- Angled paintbrush (2–2.5 inch) for cutting in edges
- Painter’s tape (blue or green low-tack tape)
- Drop cloths or plastic sheeting
- Paint edger tool
- Stir sticks
- Paint can opener
- Step ladder
- Damp rags and paper towels for quick cleanups
- Plastic bags or wrap for furniture legs
- Painter’s plastic for large furniture
Investing in quality tools especially a good roller and painter’s tape makes a significant difference in how clean and precise your final result looks.
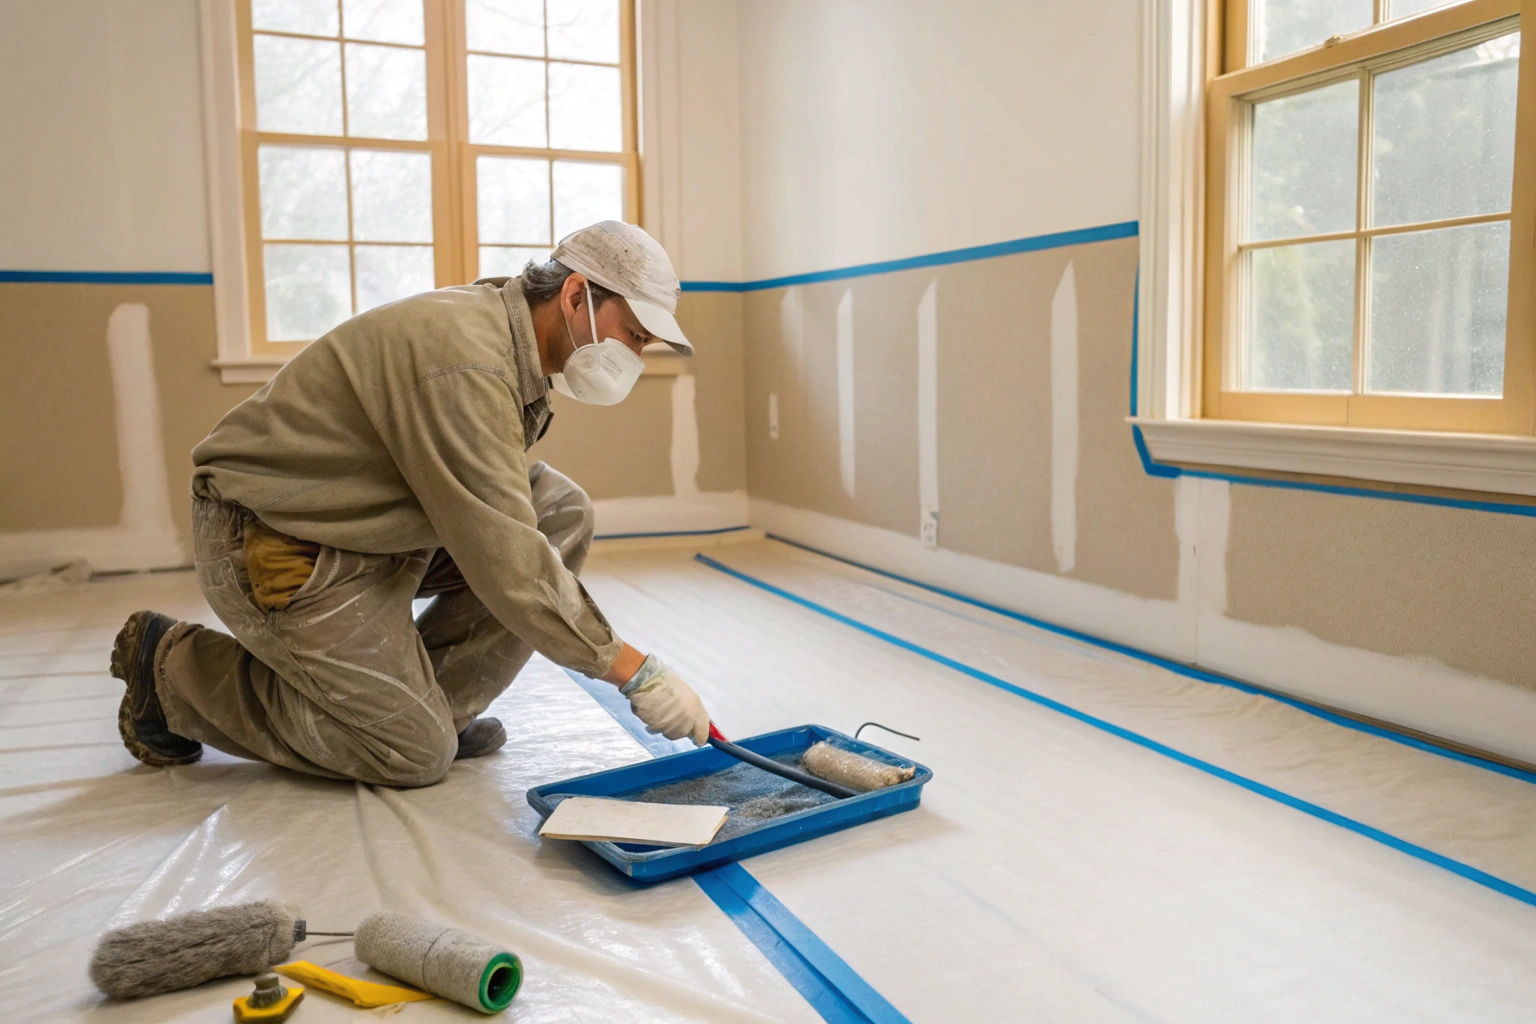
How to Prepare a Room for Painting
Clear and Protect the Room
The first step in how to paint a room without making a mess is to remove as much furniture as possible. For items too heavy to move, push them to the center of the room and cover them completely with plastic drop cloths or old bedsheets. Secure the covers with tape so they don’t shift while you work.
Remove switch plates, outlet covers, curtain rods, and any wall hangings. Place all hardware in a labeled zip-lock bag so nothing gets lost.
Lay Down Drop Cloths Properly
One of the most important mess-prevention tips is using proper drop cloths. Canvas drop cloths are the gold standard — they absorb drips, don’t slip around, and are reusable. Avoid thin plastic sheeting on the floor as it can be slippery and allows wet paint to pool.
Overlap drop cloths at the edges and tape them down against the baseboards so no floor surface is exposed. This is especially critical near walls where drips are most likely.
Apply Painter’s Tape Like a Pro
Applying painter’s tape correctly is one of the most effective room painting tips for a clean finish. Run tape along:
- Baseboards and trim
- Ceiling edges
- Window and door frames
- Light switch and outlet borders
Press the tape down firmly with a putty knife or your fingernail to seal the edge. This prevents paint from bleeding underneath, which is one of the most common causes of a messy paint job. Remove the tape at a 45-degree angle while the paint is still slightly wet — not fully dry for the cleanest edge.
Step-by-Step Guide to Painting a Room Without Drips or Splatters
1. Fix Wall Imperfections First
Before painting, fill any holes, cracks, or dents with spackling compound. Sand the patched areas smooth once dry. Painting over bumps and holes not only looks bad but also causes uneven paint distribution that leads to more drips.
2. Clean the Walls
Dirty walls cause paint to adhere unevenly and can lead to peeling over time. Wipe down walls with a damp cloth or a solution of mild dish soap and water. Pay extra attention to areas near the kitchen, doorways, and light switches where grease and fingerprints accumulate. Let the walls dry completely before painting.
3. Apply Primer When Needed
If you’re painting over a dark color, bare drywall, or a stained surface, applying a coat of primer is essential. Primer creates a uniform base that helps paint adhere better, reduces the number of coats needed, and prevents old colors or stains from bleeding through. A good primer dramatically reduces the risk of patchiness that leads to repeated coats and more chances for drips.
4. Cut In the Edges First
“Cutting in” means painting a 2–3 inch band around all edges — corners, ceiling lines, baseboards, and trim — using an angled brush before using a roller. This technique is critical for a clean, mess-free paint job because it ensures full coverage in tight areas without having to roll too close to surfaces you don’t want painted.
Work in sections of about 3–4 feet at a time, and always blend the cut-in edges before they dry by rolling over them while still wet. This prevents visible brush lines on the finished wall.
5. Load Your Roller Correctly
Overloaded rollers are the number one cause of paint drips and splatters. To load the roller properly:
- Pour paint into the deep end of the roller tray
- Roll the roller back and forth in the shallow ridged section to distribute paint evenly
- The roller should look evenly coated but not dripping
Never dip the roller directly into a full paint can. This causes uneven loading and almost always results in excess paint on the roller that drips onto your floor or furniture.
6. Use the Right Rolling Technique
Using a slow, controlled W or M pattern on the wall is the best technique for painting a room without splatters. Start by rolling a large W shape on the wall, then fill it in without lifting the roller. This distributes paint evenly and minimizes the fast, back-and-forth motion that causes splatter.
Keep the roller moving at a moderate pace — rolling too fast causes spray and splatter. Maintain even pressure throughout.
7. Work from Top to Bottom
Always paint from the ceiling down to the baseboards. This way, any drips from upper sections land on unpainted or soon-to-be-painted areas below. If you start at the bottom and work up, drips from the top will ruin sections you’ve already finished.
8. Apply Multiple Thin Coats
One thick coat of paint might seem faster, but it always leads to drips, uneven coverage, and longer drying times. Instead, apply two or three thin, even coats, allowing each coat to dry fully before applying the next. This is one of the most overlooked DIY room painting tips for a professional-looking finish.
How to Avoid Common Paint Splatters and Drips
Even with good technique, splatters happen. Here’s how to minimize them:
Keep a damp rag close at all times. Fresh paint wipes off almost any surface easily. The moment you notice a drip or splatter, blot it immediately with a damp cloth. Don’t rub — blot gently to avoid spreading it.
Don’t overload your brush. When using a paintbrush, dip only the bottom third of the bristles into the paint and tap (don’t wipe) the brush lightly against the inside of the can to remove excess.
Use a roller with the right nap. For smooth walls, use a short nap roller (3/8 inch). For textured surfaces, use a thicker nap (1/2 to 3/4 inch). Using the wrong nap creates inconsistent paint application that leads to drips.
Cover doorknobs and hardware. Wrap doorknobs and hinges in plastic wrap or painter’s tape before you start. These are easy to forget and tedious to clean up afterward.
How to Clean Up After Painting a Room
Cleaning up properly is just as important as the painting itself. Here’s how to do it without making another mess:
- Remove painter’s tape slowly at a 45-degree angle before the paint is fully cured
- Wash rollers and brushes with warm water immediately if using latex paint, or with mineral spirits for oil-based paint
- Seal leftover paint tightly and store it upright in a cool, dry location for touch-ups
- Fold drop cloths inward (so any dried paint flakes stay contained) before shaking or moving them
- Replace outlet covers, switch plates, and hardware once the paint is fully dry — typically 24 hours for latex paint
Pro Tips for a Mess-Free Room Painting Experience
These expert-level room painting tips will take your results from good to great:
- Paint in natural or bright light so you can spot missed spots and drips as you go
- Keep a wet edge — always overlap into the last section before it dries to avoid lap marks
- Use a paint grid instead of a tray for large rollers — it distributes paint more evenly and reduces drips
- Tape a paper plate under your paintbrush when cutting in to catch any unexpected drips
- Ventilate the room well — open windows speed up drying time and reduce fumes
Conclusion
Knowing how to paint a room without making a mess comes down to three things: thorough preparation, the right tools, and controlled technique. By taking the time to protect your surfaces, apply painter’s tape properly, load your roller correctly, and work methodically from top to bottom, you can achieve a clean, professional-looking paint job without the stress of a massive cleanup afterward.
The difference between a messy DIY paint job and a neat, polished one isn’t talent — it’s preparation. Follow these steps, take your time, and your freshly painted room will look like a pro did it.
Frequently Asked Questions
How do I prevent paint from dripping when painting walls?
The main causes of paint drips are overloading the roller or brush and painting too fast. Load your roller evenly using the ridged section of the tray, apply paint using slow and controlled strokes, and always use thin coats rather than one thick coat.
What is the best way to protect floors when painting a room?
Canvas drop cloths are the best option for protecting floors. They absorb drips, stay in place, and are reusable. Tape the edges against the baseboard so no floor is exposed near the walls where most drips occur.
How long should I leave painter’s tape on after painting?
Remove painter’s tape while the paint is still slightly tacky — usually 1–2 hours after the final coat. Waiting until the paint is completely dry can cause the tape to pull off dried paint along with it, leaving uneven edges.
Can I paint a room without using painter’s tape?
You can, but it requires a very steady hand and good cutting-in technique. For most DIYers, painter’s tape is highly recommended as it dramatically reduces the chance of accidental paint on trim, ceilings, and baseboards.
How do I clean paint off floors and surfaces quickly?
Always keep a damp cloth within reach. Fresh latex paint wipes off easily with water. For dried paint, a plastic scraper works on hard floors, and rubbing alcohol can help on wood or tile. For carpet, act immediately — blot, don’t rub, with a damp cloth.
How many coats of paint does a room need?
Most rooms need two coats of paint for even, full coverage. If you’re painting over a dark color or bare drywall, applying a primer first followed by two coats of paint is the best approach.
What type of paint is best for painting interior walls without mess?
Latex (water-based) paint is the best choice for most interior walls. It dries faster, cleans up easily with water, has lower fumes than oil-based paint, and is less prone to drips and runs when applied correctly.